Page 1 of 1
General Installation Notes
Any adhesives, sealants, fillers or paint used must be compatible with the material that is being installed (see manufacturer’s recommendations in the
Finishing and Adhesives section below). Always use corrosion-resistant mechanical nails or screws along with manufacturer’s recommended adhesive
product when installing all Fypon products. This combination provides a secure, long-lasting bond. Countersink all fasteners about
1
/
8
” and fill with
product compatible filler. Exterior installations should be finished using a manufacturer’s recommended caulk to prevent water infiltration behind
siding, windows and doors. Some exterior installations, in particular new construction before siding is applied, may require a J-channel and/or
flashing to prevent water infiltration. Installers must determine which installation technique is best for the specific situation.
Finishing and Adhesives
Polyurethane (PUR) – Fypon polyurethane products are factory primed. Depending on product location, always use interior/exterior-grade, PUR
compatible adhesives, sealants, and fillers when installing Fypon products. Consult the manufacturer’s recommendations for your particular
climate and the substrate you are installing to.
Cellular PVC – Depending on product location, always use interior/exterior-grade, PVC compatible adhesives, sealants, and fillers when installing
Fypon products. Consult the manufacturer’s recommendations for your particular climate and the substrate you are installing to. If painting is
desired, a 100% acrylic latex paint with a Light Reflectance Value (LRV) of 55% or higher must be used. Applying paint with an LRV of 54% or
lower will void the warranty.
IMPORTANT:
Please read these installation guidelines thoroughly before beginning installation. Please note that these guidelines are provided only to assist with the installation of Fypon moulding
and millwork products. Modified procedures may be required in order to meet specific situations, unique applications and local building codes. The manufacturer does not, under any
circumstances, warrant the installation of its products. Be sure to wear appropriate protective clothing, gloves and safety glasses when working with any tools. Installer should check
for and relocate all electrical wiring within the proposed installation area, as needed (be sure to disconnect all electric power before working with any electrical wiring and follow all
applicable local electrical codes and safety procedures).
Fypon, Ltd. 1750 Indian Wood Circle Maumee, Ohio 43537 1.800.446.3040 www.fypon.com
Wall Niche
INSTALLATION INSTRUCTIONS
Materials Needed:
• ReciprocatingSaw
• Ladder
• TapeMeasure
• Hammer
• Corrosion-ResistantFasteners
• NailCountersink
• CaulkingGun
• SafetyGlasses
• Spackle
• Caulk
• FineSandpaper
• LatexPaint
• PolyurethaneCompatibleAdhesive
1. Locate Studs
Useastudnderortapthewalltoidentifywherethestudsareinyourwall.Fyponnichesaredesignedtotbetweenthestuds.
2. Plan Your Layout
Planyourlayoutcarefully.Youmaywanttocutasmallpilotholebetweenthestuds,inordertoidentifyanyelectrical,plumbingorframing
membersthatmaybeinthecavitybehindthedrywall.
3. Outline Opening on Wall
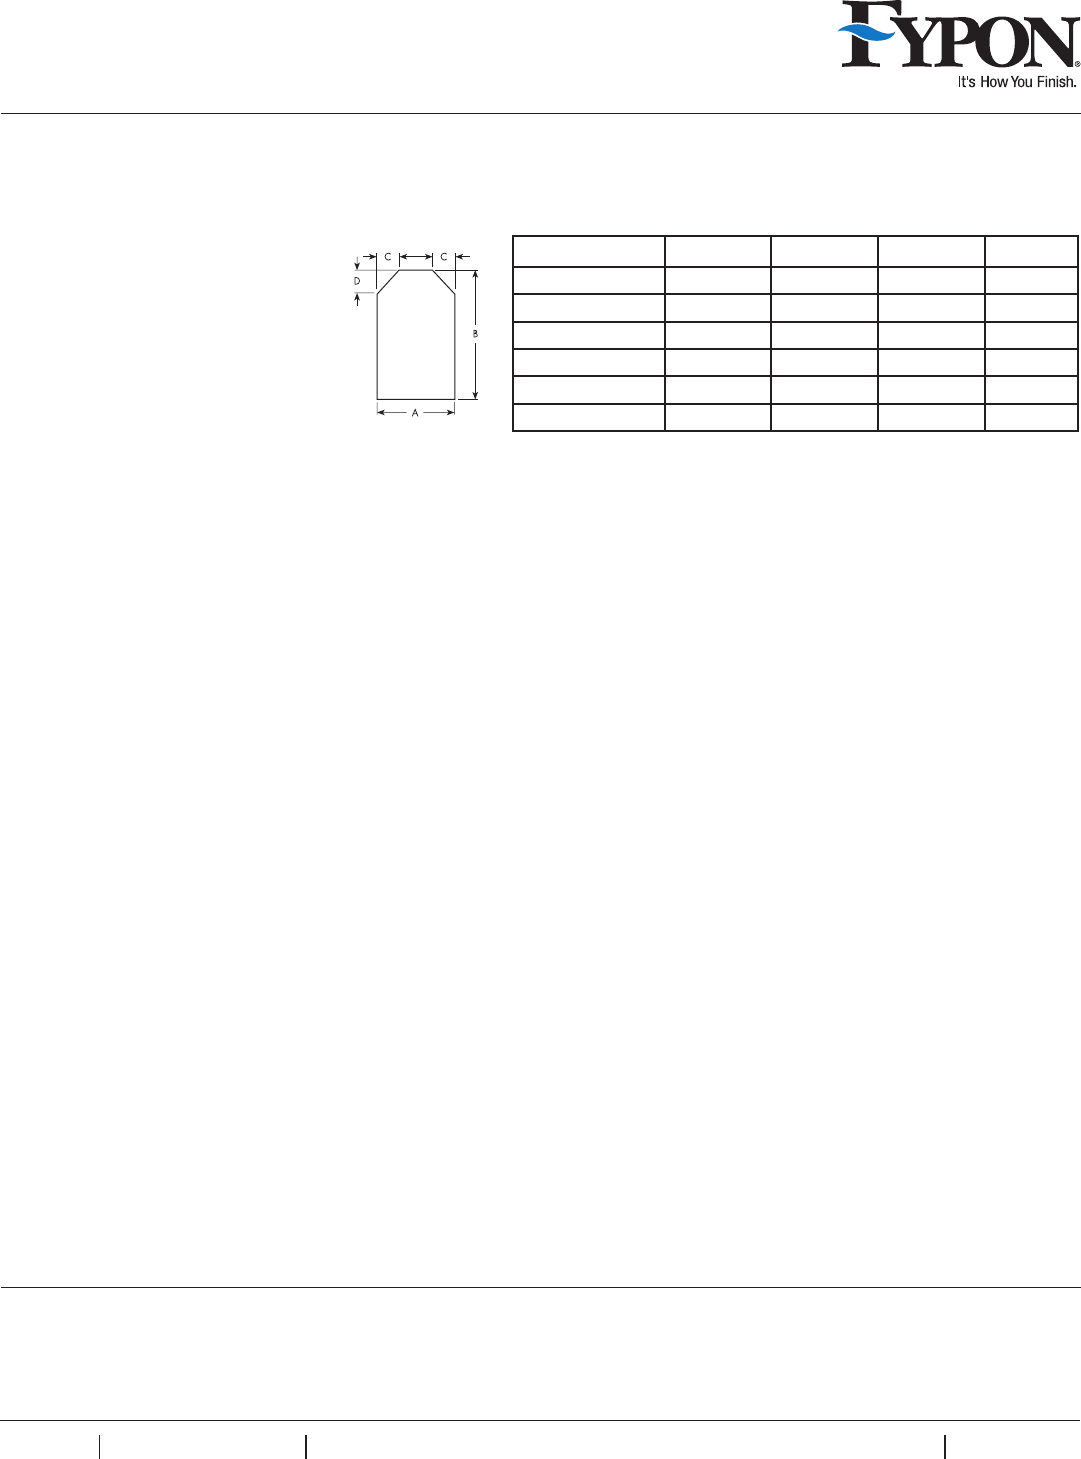
Refertothechartabovetodeterminetheroughopeningsizeandtransfertheroughopeningdimensionsdirectlytothewall.Usealevelasa
straightedgetoensurethelinesareplumbandlevel.CAUTION:Planyourlayoutcarefully.Notethatelectrical,plumbingorframingmembers
maybeinthecavitiesbehindthewall.
4. Cut the Rough Opening and Set Niche Into Place
CuttheroughopeninginthewallfollowingthelinesdrawninStep3.Applyabeadofadhesivetothebackoftheniche,whereitcontactsthe
wall.Setthenicheintotheopeningandlevelitintoplace.Attachthenicheinplaceusingfasteners.
5. Patch Holes & Touch Up or Paint
Niche Rough Opening Sizes
Part Number A B C D
NCH18X30 14½" 26" 4" 4"
NCH19X40 14½” 37” 4
7
/
16
” 4
7
/
16
”
NCH26X46 23¾" 41" 6
15
/
16
" 6
15
/
16
"
NCHS26X46 23¾" 41" 6
15
/
16
" 6
15
/
16
"
NCH34X62 26¼" 54½" 7¼" 7¼"
NCHS34X62 26¼" 54½" 7¼" 7¼"
 (1 pages)
 Manymanuals.com
 Manymanuals.de
 Manymanuals.fr
 Manymanuals.it
 Manymanuals.pl
 Manymanuals.cz
 Manymanuals.es
 Manymanuals-pt.com
Comments to this Manuals